单机安装版
版本
Centos版本:6.10
tracker和storage使用相同的安装包,下载地址:http://sourceforge.net/projects/FastDFS/ 或https://github.com/happyfish100/fastdfs(推荐)
本教程使用:
https://github.com/happyfish100/fastdfs 版本V6.06
FastDFS安装环境
FastDFS是C语言开发,建议在linux上运行,centos7.x
安装FastDFS需要先将官网下载的源码进行编译,编译依赖gcc环境,如果没有gcc环境,需要安装gcc:yum install gcc-c++
安装libevent
FastDFS依赖libevent库,需要安装:
yum -y install libevent
安装libfastcommon
libfastcommon是FastDFS官方提供的,libfastcommon包含了FastDFS运行所需要的一些基础库。
到软件包目录下载libfastcommon
1 | git clone https://github.com/happyfish100/libfastcommon.git --depth 1 |
fastdfs安装(源码编译安装)
1 | cd ../ #返回上一级目录 |
默认安装方式安装后的相应文件与目录:
服务脚本:
/etc/init.d/fdfs_storaged
/etc/init.d/fdfs_trackerd
配置文件
/etc/fdfs/http.conf
/etc/fdfs/tracker.conf
/etc/fdfs/client.conf
/etc/fdfs/storage.conf
/etc/fdfs/mime.types
/etc/fdfs/storage_ids.conf
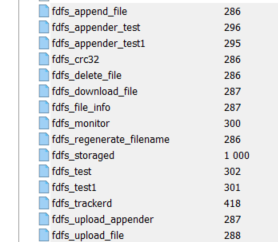
命令工具在 /usr/bin/ 目录下:

nginx安装(源码编译安装)
版本:1.16.1
此处nginx用于storage服务,解决同步延时问题和提供http的访问
1 | wget http://nginx.org/download/nginx-1.16.1.tar.gz #下载nginx压缩包 |
#使用默认配置nginx
1 | # ./configure |
#编译
1 | # make |
#安装
1 | # make install |
nginx常用目录:
安装目录:/usr/local/nginx/
配置文件路径:/usr/local/nginx/conf/nginx.conf
日志路径: /usr/local/nginx/logs/
查看nginx的版本及模块:/usr/local/nginx/sbin/nginx -V
安装配置fastdfs-nginx-module模块
版本:1.22
#下载地址: https://codeload.github.com/happyfish100/fastdfs-nginx-module/tar.gz/V1.22
1 | # tar -zxvf fastdfs-nginx-module-1.22.tar.gz |
编辑 fastdfs-nginx-module-1.22/src/config 文件

改变的文件内容ngx_module_incs="/usr/include/fastdfs /usr/include/fastcommon/"CORE_INCS="$CORE_INCS /usr/include/fastdfs /usr/include/fastcommon/"
配置nginx,添加fastdfs-nginx-module 模块:
1 | # 先停掉nginx服务 如果没有配置为服务 则使用 |
#进入nginx源码目录
1 | cd /usr/local/src/nginx-1.16.1/ |
#添加fastdfs-nginx-module 模块
1 | [root@localhost nginx-1.16.1]#./configure --add-module=/opt/fastdfs-nginx-module-1.22/src/ |
#验证是否加载fastdfs-nginx-module模块是否 ,有如下标记部分表示成功
1 | /usr/local/nginx/sbin/nginx -V |
nginx version: nginx/1.16.1
built by gcc 4.4.7 20120313 (Red Hat 4.4.7-23) (GCC)
configure arguments: --add-module=/opt/fastdfs-nginx-module-1.22/src/
复制 fastdfs-nginx-module 源码中的配置文件 mod_fastdfs.conf 到/etc/fdfs 目录, 并修改
1 | # cp /usr/local/src/fastdfs-nginx-module-1.22/src/mod_fastdfs.conf /etc/fdfs/ |
修改如下配置,其它默认
1 | tracker_server=192.168.0.200:22122 |
tracker配置
安装成功后进入/etc/fdfs目录:

修改tracker.conf
1 | vim tracker.conf |
如果显示磁盘空间不足,修改如下内容或者修改base_path相关路径地址
1 | # reserved storage space for system or other applications. |
storage配置
进入/etc/fdfs目录:
vim storage.conf
#需要修改的内容如下
1 | group_name = group1 此存储服务器属于的组名 |
client配置
1 | vim /etc/fdfs/client.conf |
nginx配置
#配置nginx.config
vim /usr/local/nginx/conf/nginx.conf
#修改如下红色配置,在server中添加location配置
1 | server { |
启动
Tracker命令 [start | stop | restart]
/usr/bin/fdfs_trackerd /etc/fdfs/tracker.conf restart
storage命令[start | stop | restart]
/usr/bin/fdfs_storaged /etc/fdfs/storage.conf restart
Nginx命令stop, quit, reopen, reload
/usr/local/nginx/sbin/nginx -s reload
监测启动情况查看
/usr/bin/fdfs_monitor /etc/fdfs/storage.conf

查看日志
tail -n10 /home/fastdfs/logs/trackerd.log #base_path对应的目录下logs
tail -n10 /home/fastdfs/logs/storaged.log #base_path对应的目录下logs
#如果日志显示有错误信息,需要根据信息来查找错误原因
设置开机自动启动。
[root@tracker FastDFS]# vim /etc/rc.d/rc.local
将运行命令行添加进文件:
/usr/bin/fdfs_trackerd /etc/fdfs/tracker.conf restart
/usr/bin/fdfs_storaged /etc/fdfs/storage.conf restart
/usr/local/nginx/sbin/nginx -s reload
测试
#测试上传比如nginx-1.16.1.tar.gz文件,返回ID表示成功 如:group1/M00/00/00/xx.tar.gz
/usr/bin/fdfs_upload_file /etc/fdfs/client.conf /usr/local/src/nginx-1.16.1.tar.gz
#测试下载,用外部浏览器访问刚才已传过的文件,引用返回的ID
http://xxx:8888/group1/M00/00/00/xxx.tar.gz