Mybatis备忘
缓存
默认缓存设置
在MyBatis中,关于缓存设置的参数一共有2个:localCacheScope,cacheEnabled。
1
2
3
4
| <!-- 有效值: true|false,默认值为true -->
<setting name="cacheEnabled" value="true" />
<!-- 有效值:SESSION|STATEMENT,默认值为SESSION -->
<setting name="localCacheScope" value="SESSION" />
|
那么这两个参数分别在什么地方使用呢?不妨先走读一下MyBatis的相关源码。
首先,来看看参数cacheEnabled的应用。
- org.apache.ibatis.session.defaults.DefaultSqlSessionFactory
1
2
3
4
5
6
7
8
9
10
11
12
13
14
15
16
17
18
19
20
21
22
23
24
25
26
|
SqlSession sqlSession = sqlSessionFactory.openSession(true);
@Override
public SqlSession openSession(boolean autoCommit) {
return openSessionFromDataSource(configuration.getDefaultExecutorType(), null, autoCommit);
}
private SqlSession openSessionFromDataSource(ExecutorType execType, TransactionIsolationLevel level, boolean autoCommit) {
Transaction tx = null;
try {
final Environment environment = configuration.getEnvironment();
final TransactionFactory transactionFactory = getTransactionFactoryFromEnvironment(environment);
tx = transactionFactory.newTransaction(environment.getDataSource(), level, autoCommit);
final Executor executor = configuration.newExecutor(tx, execType);
return new DefaultSqlSession(configuration, executor, autoCommit);
} catch (Exception e) {
closeTransaction(tx);
throw ExceptionFactory.wrapException("Error opening session. Cause: " + e, e);
} finally {
ErrorContext.instance().reset();
}
}
|
- org.apache.ibatis.session.Configuration
1
2
3
4
5
6
7
8
9
10
11
12
13
14
15
16
17
18
19
20
21
22
23
|
public Executor newExecutor(Transaction transaction, ExecutorType executorType) {
executorType = executorType == null ? defaultExecutorType : executorType;
executorType = executorType == null ? ExecutorType.SIMPLE : executorType;
Executor executor;
if (ExecutorType.BATCH == executorType) {
executor = new BatchExecutor(this, transaction);
} else if (ExecutorType.REUSE == executorType) {
executor = new ReuseExecutor(this, transaction);
} else {
executor = new SimpleExecutor(this, transaction);
}
if (cacheEnabled) {
executor = new CachingExecutor(executor);
}
executor = (Executor) interceptorChain.pluginAll(executor);
return executor;
}
|
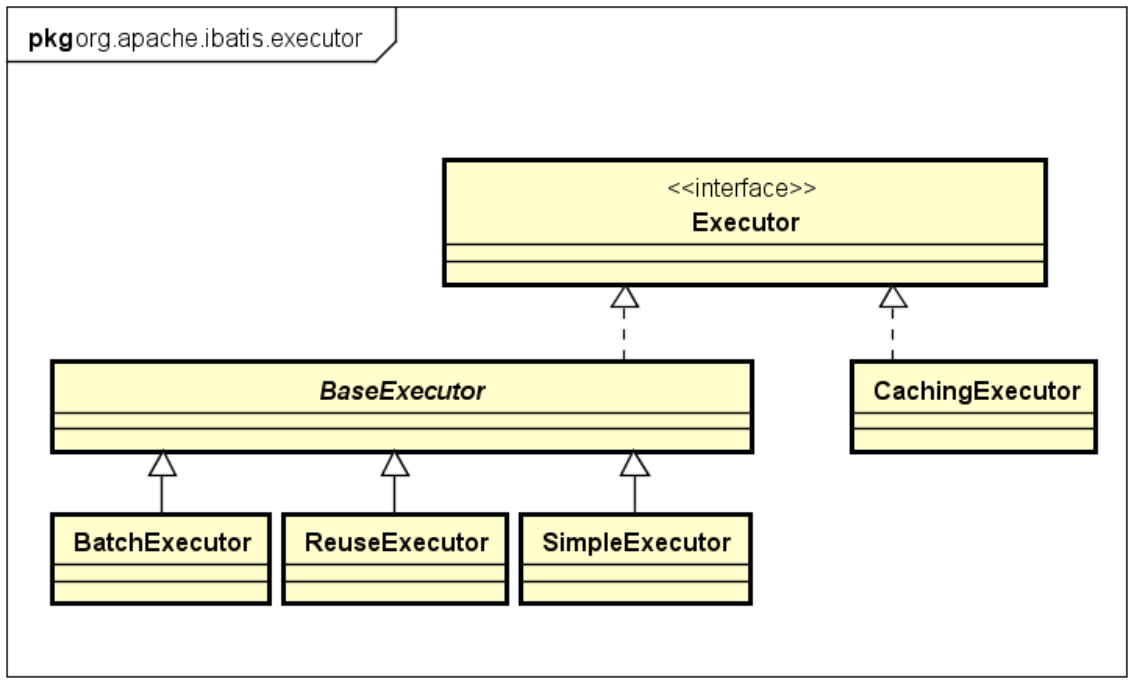
从上述源码中可以看到,MyBatis会根据配置参数defaultExecutorType的值使用不同的执行器:BatchExecutor,ReuseExecutor,SimpleExecutor。此外,当参数cacheEnabled值为true时,会使用一个特别的执行器:CachingExecutor。那么,不同的执行器有什么不同呢?他们有什么联系吗?下图为MyBatis中执行器的类图。

OK,到这里我们就可以对MyBatis中控制缓存的2个参数做一个浅显的总结:
(1)参数cacheEnabled控制MyBatis使用的执行器类型
(2)参数localCacheScope控制的是BaseExecutor内部的缓存策略
缓存实现原理分析
参数localCacheScope控制的缓存策略
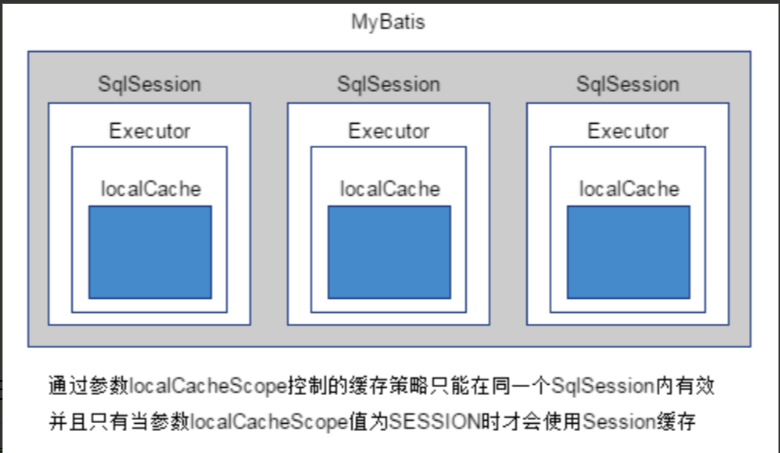
在相同的SqlSession中查询同一条数据时都会命中BaseExecutor的本地缓存。也就是说通过参数localCacheScope控制的缓存策略只能在相同SqlSession内有效,因为BaseExecutor的本地缓存对象localCache是实例属性,在不同的执行器实例中都保存一个独立的本地缓存,而在不同的SqlSession中使用的是不同的执行器实例。这个关系可以通过下图描述:

那么,到底是不是这样的呢?我们需要进行验证。
1
2
3
| <!-- 为了验证BaseExecutor内的缓存策略,需要设置cacheEnabled参数为false,默认值为true -->
<setting name="cacheEnabled" value="false"/>
<setting name="localCacheScope" value="SESSION"/>
|
1
2
3
4
5
6
7
|
SqlSession sqlSession = sqlSessionFactory.openSession(true);
Student student = sqlSession.getMapper(StudentMapper.class).getStudentById(1);
System.out.println(student);
student = sqlSession.getMapper(StudentMapper.class).getStudentById(1);
System.out.println(student);
sqlSession.close();
|
对应MyBatis输出日志如下:
1
2
3
4
5
6
7
8
9
10
11
| method: query
DEBUG [main] - Opening JDBC Connection
DEBUG [main] - Created connection 1131184547.
DEBUG [main] - ==> Preparing: select * from student where id = ?
DEBUG [main] - ==> Parameters: 1(Long)
DEBUG [main] - <== Total: 1
Student{id=1, name='张三', age=23, sex=0}
method: query
Student{id=1, name='张三', age=23, sex=0}
DEBUG [main] - Closing JDBC Connection [com.mysql.cj.jdbc.ConnectionImpl@436c81a3]
DEBUG [main] - Returned connection 1131184547 to pool.
|
显然,从输出日志中可以很确定地知道:在相同Session中查询同一条数据时,只有第一次会真正从数据库中查询,后续的查询都会直接从Session内的缓存中获取。而且,我们从上述相关源码中知道,只要SqlSession存在,该缓存是永远存在,不会失效。
参数cacheEnabled控制的缓存策略
在了解了参数localCacheScope控制的缓存策略之后,还需要继续研究参数cacheEnabled所控制的缓存策略。从上述源码分析中已经知道,当参数cacheEnabled值为true时,MyBatis将使用CachingExecutor执行器,下面通过源码解读一下CachingExecutor到底与其他Executor实现类有什么不同。
- org.apache.ibatis.executor.CachingExecutor
在不同的Session中查询同一条数据时都会从这个全局缓存中查询,下面通过实例来进行验证。
1
2
3
4
|
<setting name="cacheEnabled" value="true"/>
<setting name="localCacheScope" value="STATEMENT"/>
|
1
2
3
| // 在xml映射器中定义全局缓存
<cache />
|
在xml映射器中配置全局缓存很简单,只需要在xml映射器中简单添加一个<cache />节点即可,这里为了演示全局缓存的效果,所以不用配置详细参数,使用默认值即可。
1
2
3
|
@CacheNamespace
public interface StudentMapper {
|
在接口映射器中配置全局缓存通过注解@CacheNamespace实现,其效果与在xml映射器中通过节点<cache />配置是一样的。
通过参数cacheEnabled控制的缓存是全局的,所以在多个Session中使用相同SQL语句查询同一条数据时,只在第一次查询时直接查询数据库,之后的查询都会从这个全局缓存中读取数据。如下以通过xml映射器查询为例:
1
2
3
4
5
6
7
8
9
10
|
SqlSession sqlSession1 = sqlSessionFactory.openSession(true);
Student student = sqlSession1.selectOne("org.chench.test.mybatis.mapper.getStudentById", 1);
System.out.println(student);
sqlSession1.close();
SqlSession sqlSession2 = sqlSessionFactory.openSession(true);
student = sqlSession2.selectOne("org.chench.test.mybatis.mapper.getStudentById", 1);
System.out.println(student);
sqlSession2.close();
|
查看MyBatis的输出日志:
1
2
3
4
5
6
7
8
9
10
11
12
13
| method: query
DEBUG [main] - Cache Hit Ratio [org.chench.test.mybatis.mapper]: 0.0
DEBUG [main] - Opening JDBC Connection
DEBUG [main] - Created connection 1463355115.
DEBUG [main] - ==> Preparing: select * from test where id = ?
DEBUG [main] - ==> Parameters: 1(Integer)
DEBUG [main] - <== Total: 1
Student{id=1, name='1509690042107_haha_update_update', age=0, sex=0}
DEBUG [main] - Closing JDBC Connection [com.mysql.cj.jdbc.ConnectionImpl@573906eb]
DEBUG [main] - Returned connection 1463355115 to pool.
method: query
DEBUG [main] - Cache Hit Ratio [org.chench.test.mybatis.mapper]: 0.5
Student{id=1, name='1509690042107_haha_update_update', age=0, sex=0}
|
显然,从日志中很明显看到第一次查询时缓存命中率为0,第二次查询时缓存命中率为0.5,直接从缓存中取得了数据。
总结
MyBatis的缓存功能同时受到localCacheScope和cacheEnabled这2个运行时参数的控制。那么我们不禁要问:为什么需要使用2个参数进行控制而不是直接使用1个参数更加简洁?实际上,2个参数控制的缓存策略是不一样,localCacheScope参数控制的缓存是Session范围内的,称为一级缓存;而cacheEnabled参数控制的缓存是全局的,称为二级缓存,这对应于不同的应用需求。
显然,MyBatis的默认配置是同时开启了Session缓存和全局缓存。另外请注意:cacheEnabled参数仅仅是打开了全局缓存开关,但这并不意味着默认情况下MyBatis就会进行全局缓存。实际上,如果需要使用全局缓存,还必须在映射器中配置全局缓存实例。
【参考】
深入浅出mybatis之缓存机制

